

I've been interested foreign languages for as long as I can remember. One summer, I took an Arabic course at the city community college. Our professor, a dynamic and young native speaker from Morocco, shared her perspective of what it meant to greet a person in the person's native language. She called it a bridge and a way to build a positive connection. This resonated.
Naturally, when I learned that there was a way to do this with code in React applications, I started to learn this functionality to add it to a User Story for Asialakay.net. This way, when visitors arrived to the site, they might be greeted in their native language.
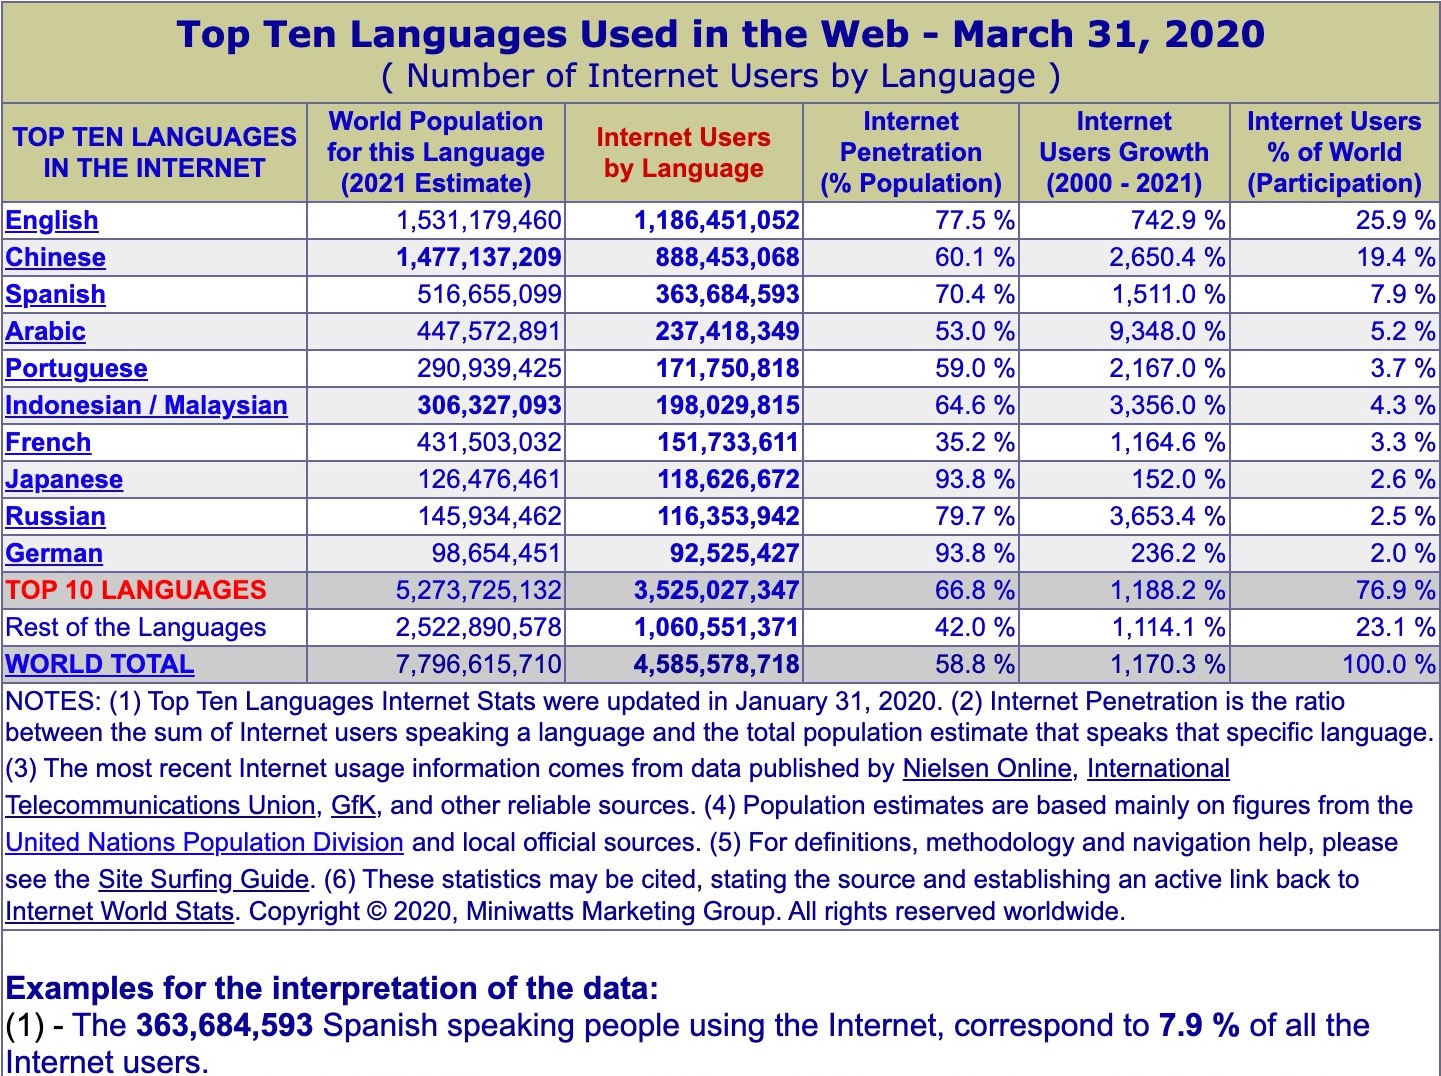 source: internetworldstats.com
USER STORY
- Users will have the option to change the language via language switcher.
DEV NOTES
I decided on i18next.
It requires node to be installed.
Checking that node is installed as well as the version.
(base) @mbp signup-app %node -v
v16.15.0
Required Dependencies
npm install i18next react-i18next i18next-browser-languagedetector
Set Up and Installation
- Create an i18n.js file to bootstrap an i18next instance
import i18next from "i18next";
import { initReactI18next } from "react-i18next";


// "Inline" English, Arabic and Chinese translations.
// localization is available for any language and any number of languages.
const resources = {
    en: {
        translation: {
            app_name: "Asia Lakay",
        },
    },
    ar: {
        translation: {
            app_name: "آسيا لاكاي",
        },
    },
    ch: {
        translation: {
            app_name: "亞拉凱"
        }
    }
};

i18next
// passes the i18n instance to react-i18next
.use(initReactI18next)
// init i18next
// view configuration options @ https://www.i18next.com/overview/configuration-options
.init({
    resources,
    lng: "ar",
    interpolation: {
        escapeValue: false,
    },
});

export default i18next;
- import i18n file into index.js for webpack bundling
import React from 'react';
import { createRoot } from 'react-dom/client';
// import ReactDOM from 'react-dom';
import App from './App';
import "bootstrap/dist/css/bootstrap.min.css";
import "../src/style.scss";
import './services/i18n';


const root = createRoot(document.getElementById('root'))
root.render(
  <React.StrictMode>
    <App />
  </React.StrictMode>
);
- add import statement for react-i18next's
useTranslationhook providing access to i18next'st()function - bind the
t()function var to theuseTranslationhook, associating it's string key to the paired active language translation from theresourcesobject in thei18n.jsfile - call the
t()function's key value with the parameter("app_name")to change the app name in the<h5>tag within the<Navbar.Brand>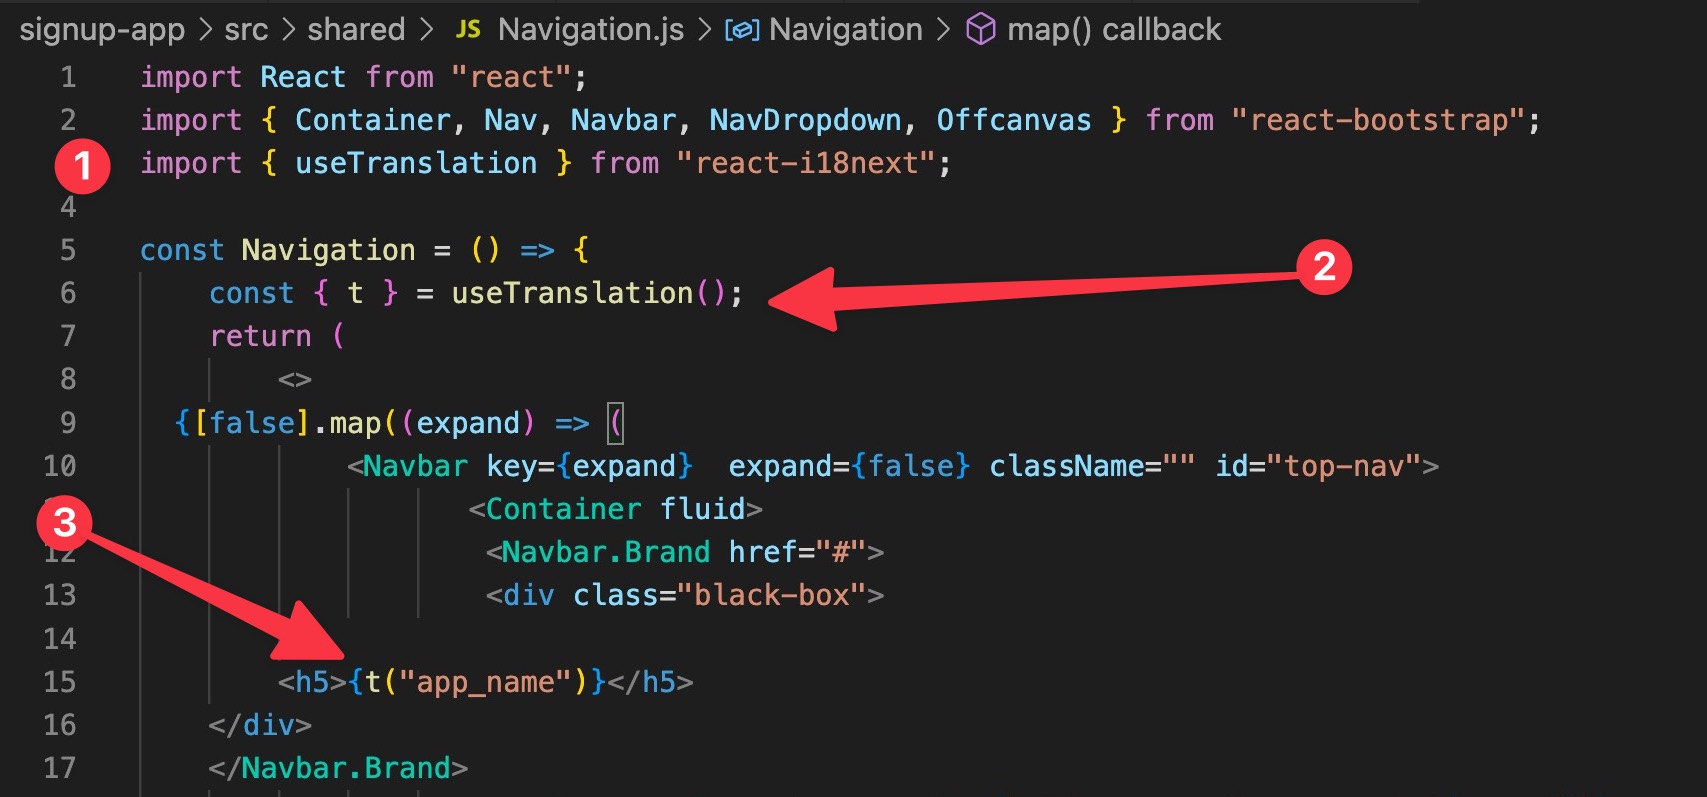
TESTING 1, 2, 3
npm start
- Keep the app running quickly by adding Lazy Loading allowing only the current active translation file to load.
-
npm install --save i18next-http-backend - add
import HttpApi from "i18next-http-backend";statement to top of i18n.js file - add another instance of the
use()function to register the(HttpApi)plugin from"i18next-http-backend"module to i18next - remove the
resourcesobject fromi18nextconst ini18n.jsfile because we can now load translations from the server as needed - add the translation files to the location that the back-end plugin expects them to be by default:
public/locales/{{lng}}/{{ns}}.jsonmeaning{{lng}}is the language code, and{{ns}}is the namespace. As this is an introduction, the default namespace,translationwill suffice. - add Suspense boundary around
<App>to prevent error while rendering.
-
Building the Language Switcher Component
- In
src/components/LanguageSwitcher.js, we added a React component that allows the user to change the active language to the one of their choice.- its code accessed the
.languageproperty value ofi18nconst through the<select>tag. (The.languageproperty can either 1) detect the current language, or 2) set a language based on the option selected. For using the primary language based on the configuration defined in the i18n.js file, use.i18next.languages[0].)
- its code accessed the
import React from "react";
import { useTranslation } from "react-i18next";

function LanguageSwitcher(){
    const { i18n } = useTranslation();

    return (
        <div className="select">
            <select
                value={ i18n.language}
                onChange=
                { (e) =>
                i18n.changeLanguage (e.target.value)}
            >
                <option value="en">English</option>
                <option value="ar">عربي</option>
            </select>
        </div>
    );
}

export default LanguageSwitcher;
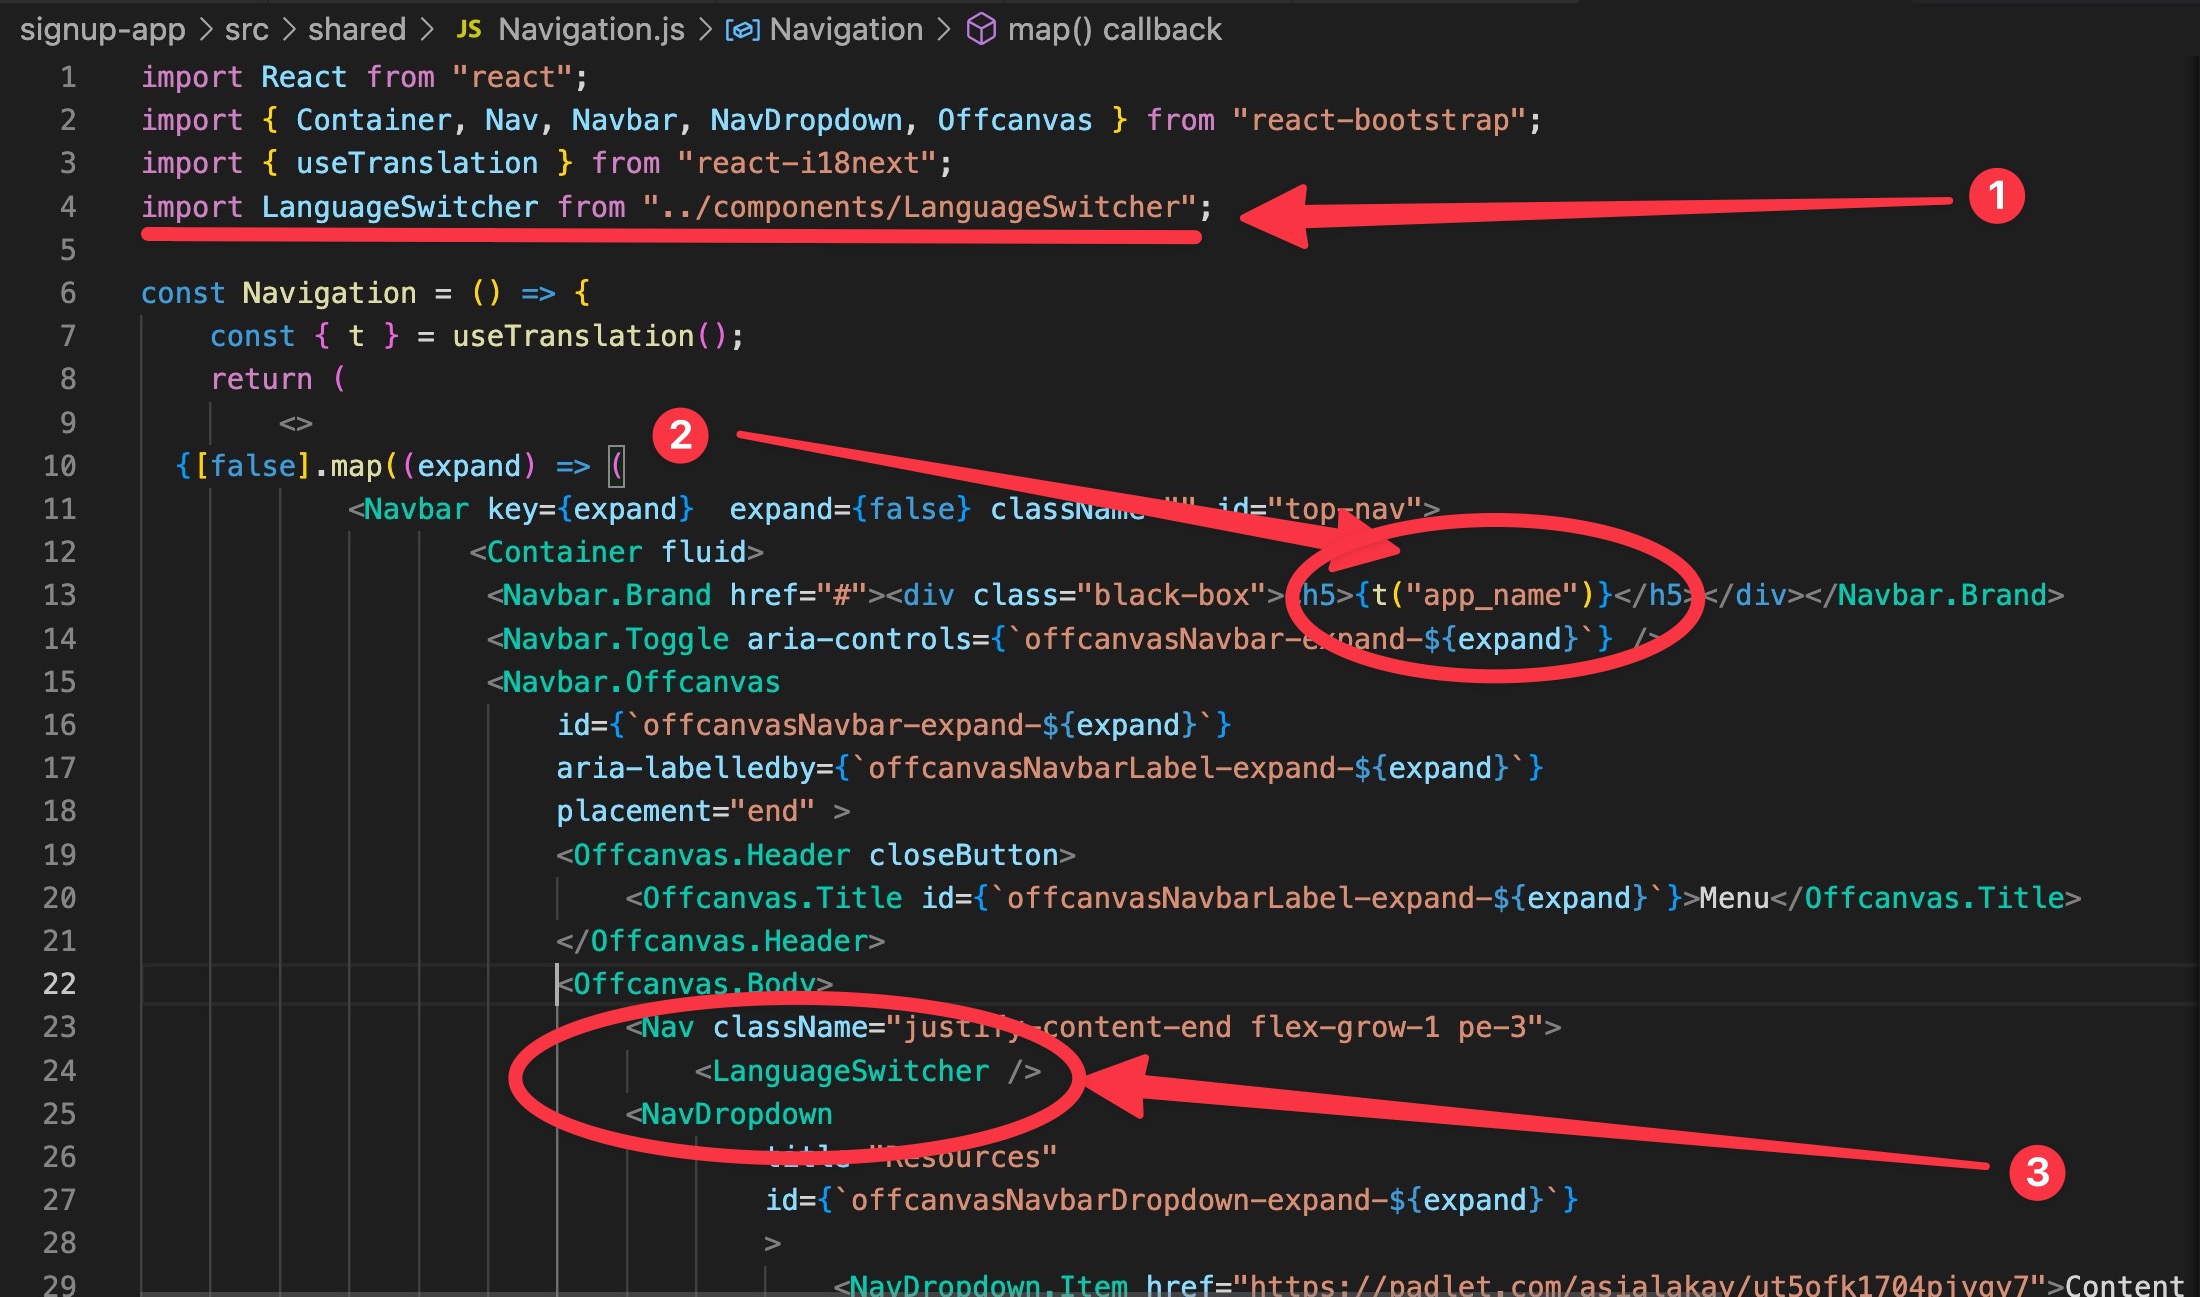
- In
src/components/Navbar.js,- added import statement to top of file
- reviewed
t()function parameter key/value - added
<LanguageSwitcher>React Component to the Navbar Menu
Changed the layout direction with language selection: left-to-right & right-to-left
In
src/App.jsimported
useEffecthook from React withimport React, {useEffect} from "react";added
import { useTranslation } from "react-i18next";added the code below to assign variables, react hooks, and properties in the
App.jsfile.const { i18n } = useTranslation();
useEffect(() => {
document.dir = i18n.dir();
}, [i18n, i18n.language]);
Next Step is to Auto-Detect the User's Language
REFERENCES